Getting TPUs#
Prerequisites#
A Google Cloud Platform (GCP) account with appropriate billing enabled.
Basic understanding of machine learning and command-line tools.
To set up your GCP Project for TPUs, see Set up a GCP Account
Supported TPUs#
Kithara supports all GCP generations and sizes of TPUs. For supported TPUs, see Cloud TPU Pricing.
TPU VM Image#
We recommend using the tpu-ubuntu2204-base image TPU VM image.
Requesting Capacity#
Please review the following steps before provisioning capacity (creating VMs):
Familiarize yourself with key concepts
Choose a TPU type
Choose a usage mode
Choose a type of capacity
Request quota
After completing these steps, you can provision capacity. Creating VMs without completing these steps first may lead to errors.
Tip
If you want to skip this section, to get started quickly, 64 chips of Trillium (TPU v6e) with DWS (Flex Start) mode in any supported zone is a good starting point. To see the size of models you can tune with this capacity, use this calculator. Instructions to create VMs are here.
Later, you can tune these parameters using the rest of the instructions in this section for production workloads.
1. Familiarize yourself with key concepts#
TPU Chip and Cores
A TPU chip typically (but not always) consists of two TPU cores which share memory and can be thought of as one large accelerator with twice the compute capacity (FLOPs). Inference-optimized chips like the TPU v5e and Trillium (TPU v6e) only have one TPU core per chip.
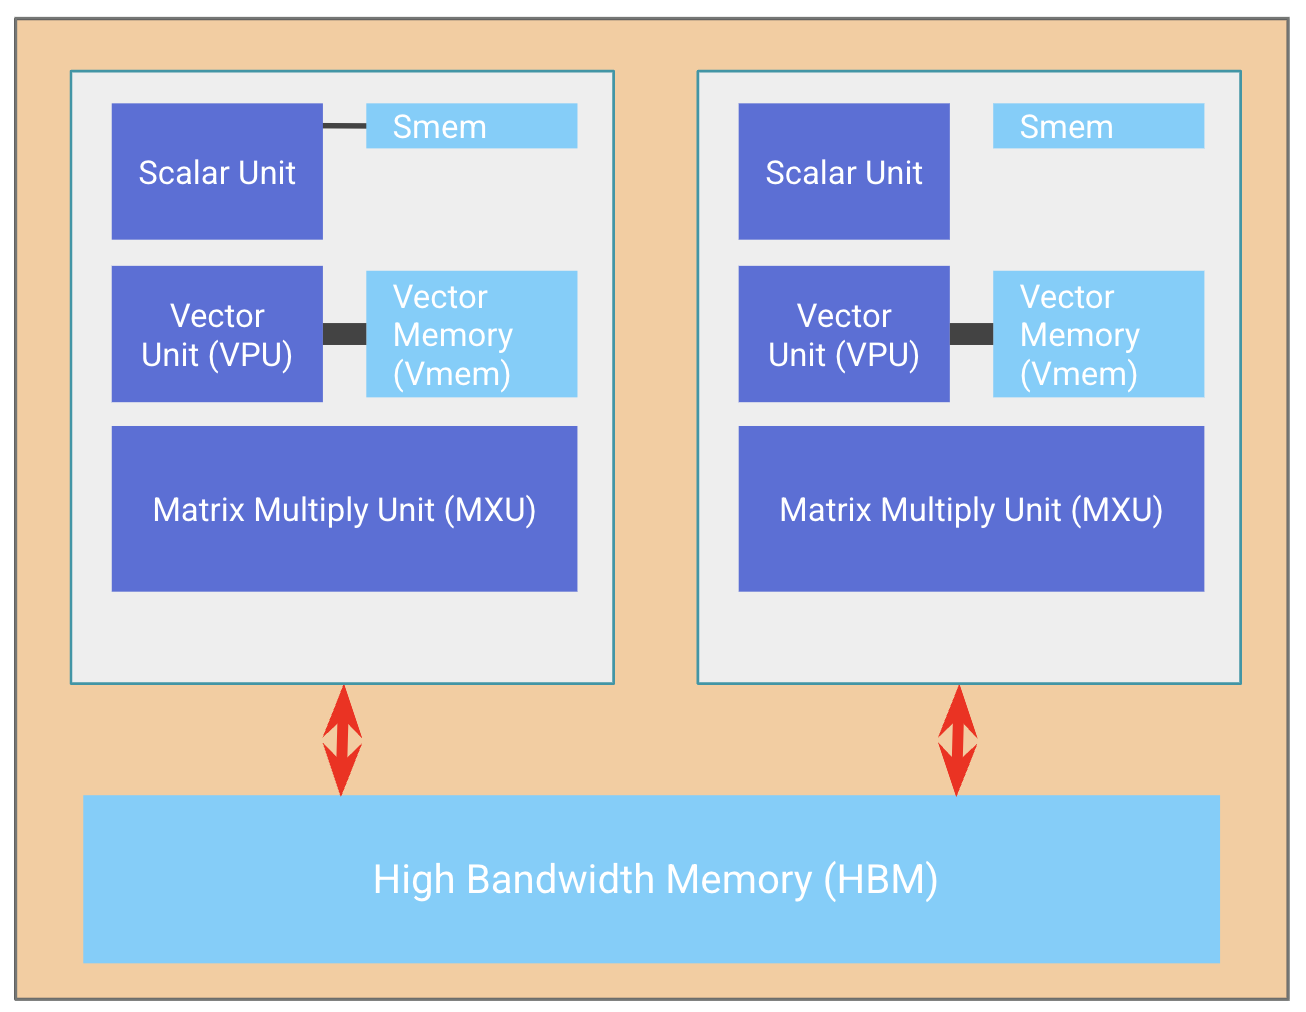
A TPU Chip (orange box) with two cores (white boxes)#
Where are these terms used typically?
Chips: To define pricing. E.g: price-per-chip-hour. Chips are also the equivalent of “devices” in the JAX language.
Cores: To create VMs. E.g: You may request a v5e-8 which requests 8 cores (for v5e, this is also equal to 8 chips). Or, you may request v5p-8 which creates a VM with 8 cores (4 chips).
TPU Type |
Number of cores |
|---|---|
TPU v4p |
2x per chip |
TPU v5p |
2x per chip |
TPU v5e |
1x per chip |
Trillium |
1x per chip |
Slices and Topology
You may see the terms topology and slice in Google Cloud TPU documentation. Topology refers to TPU networking, i.e., how the chips are connected to each other with high-speed inter-chip interconnects (ICI). A collection of chips connected to each other directly with ICI is called a slice.
The performance-optimized “p-series” (v4, v5p) are interconnected in a 3D topology. The efficient “e-series” (v5e, v6e) are interconnected in a 2D topology.
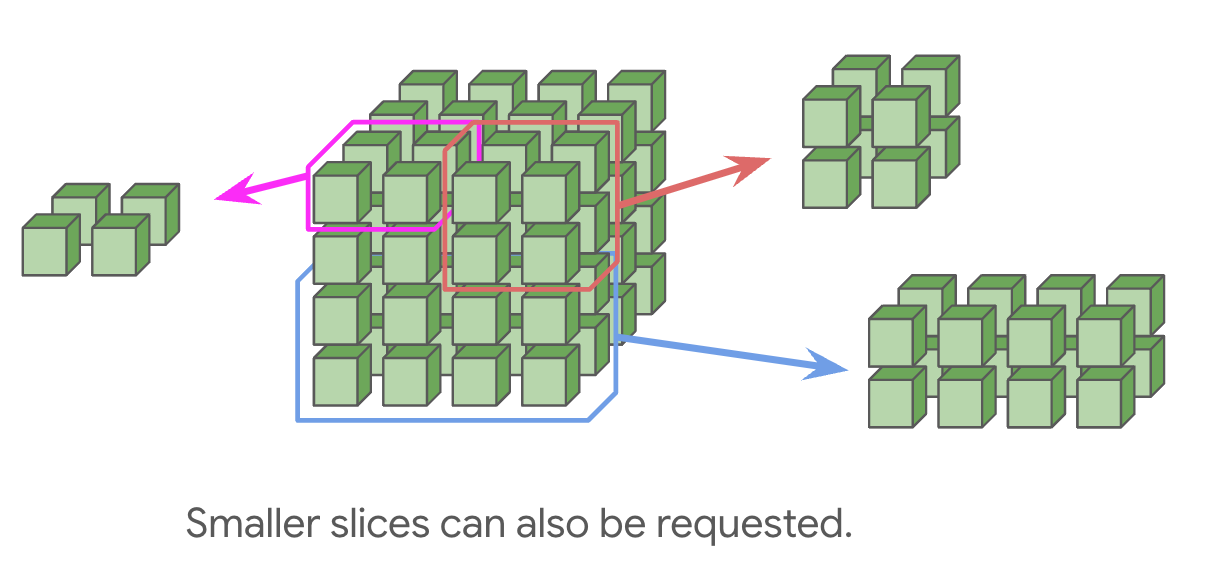
A slice with 3D topology. Left: 2x2x1 topology; Right-top: 2x2x2; Right-bottom: 2x2x4#
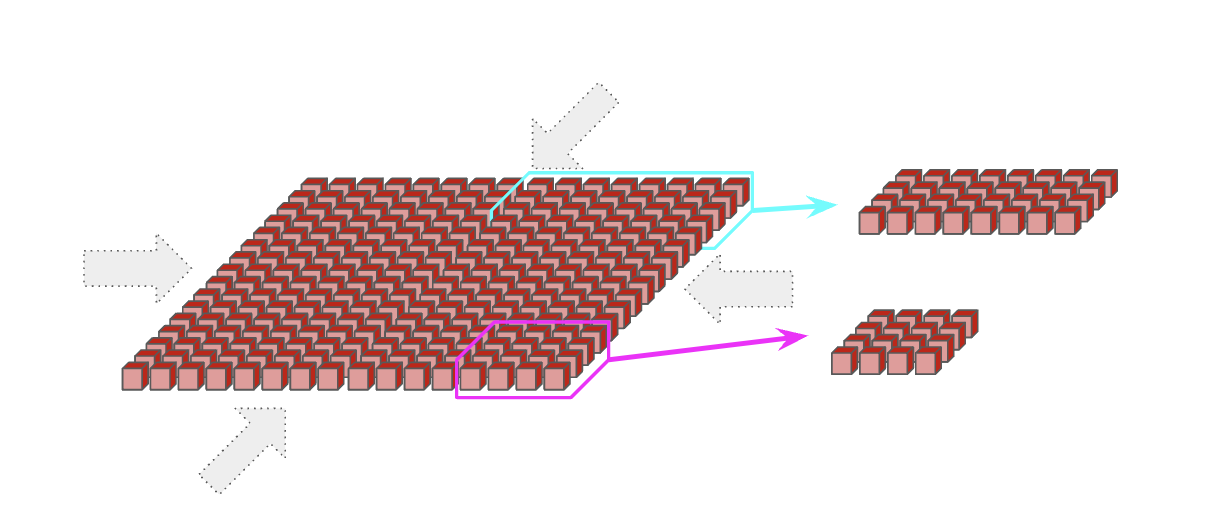
A slice with 2D topology. Right-top: 4x8; Right-bottom: 4x4#
Tip
For most users, the simplest way to get started is to simply create a VM specifying the number of cores you want to use (e.g: v5e-8) without specifying a specific slice shape. This will automatically create the largest slice possible.
Recap: A v5p-128 slice = 128 cores = 64 chips = 4x4x4 topology = 4x4x4 slice
If you are interested, you can read more about TPU networking here.
2. Choose a TPU Type#
Tip
For most Kithara workloads, we recommend choosing TPU v5e or Trillium since they have the most availability.
Additionally, here are some recipes to map your model and workload to an appropriate TPU generation and chips:
Note
You can use this calculator if you do not want to identify the right TPU type manually using the formulas below.
Identify the total HBM memory required by your model using the table at the bottom of the page.
Identify the per-chip HBM memory of the TPU generation of your interest
TPU v4: 32GB per chip
TPU v5e: 16GB per chip
TPU v5p: 96GB per chip
TPU v6e (Trillium): 32GB per chip
Calculate how many chip you will need
Divide total required HBM by per-chip HBM
Example: 35GB HBM required / 32GB per TPU V4 = 1.09 → Use 2 chips minimum
Consider Topology Constraints
TPUs are arranged in pods with specific slice configurations
Common topologies: 2×2×1 (4 chips), 2×2×2 (8 chips), 4×4×4 (64 chips)
Choose next largest supported topology that meets your memory needs
How much total TPU HBM do I need for fine tuning my model?
Model size |
Full Parameter |
LoRA |
|---|---|---|
2b |
32 GB |
10 GB |
9b |
144 GB |
40 GB |
27b |
432 GB |
124 GB |
70b |
1,120 GB |
322 GB |
405b |
6,480 GB |
1,863 GB |
These approximates assume you are training with the default mixed precision strategy (i.e. model weights loaded in full precision, activations casted to bfloat16).
Tip
Total HBM required = Model Size + Optimizer Size + Buffer for intermediates
Model Parameters
Required Memory = (Model Size in Billions) × 4GB
Example: 2B model requires 8GB
Optimizer State
Full Fine-tuning: 3 × Model Parameter Memory
Partial Fine-tuning: (% trainable parameters) × Full Optimizer Memory
Example: 2B model
Full fine-tuning: 24GB
5% partial fine-tuning: 1.2GB
Buffer for intermediates
Reserve ~10GB extra HBM memory for intermediate tensors
Memory usage scales linearly with batch size and sequence length
If experiencing Out-of-Memory (OOM):
Reduce batch size
Reduce sequence length
3. Choose a usage mode (consumption type)#
Type |
How it works |
Supported versions, zones and billing |
Best fit for: |
Spot/Preemptible |
You request TPU resources which could be preempted. Spot VMs are available at a much lower price than on-demand resources. Spot VMs might be easier to obtain than on-demand resources but can be preempted (shut down) at any time. There is no limit on runtime duration. |
All versions and zones . Billing: Hourly, based on actual usage. |
ML users who want to run batch / fault-tolerant workloads. Read more about Spot here. |
On Demand |
You request TPU resources to be used as soon as possible, for as long as you want. On-demand resources won’t be preempted, but there’s no guarantee that there will be enough available TPU resources to satisfy your request. On demand is the default when you create TPU resources. |
All versions and zones . Billing: Hourly, based on actual usage. |
On demand is a good fit for workloads that require a flexible end time, likely longer than 7 days. |
Dynamic Workload Scheduler (DWS) - Flex Start |
You request TPU resources for a specific amount of time, up to 7 days. DWS resources are delivered from a dedicated pool of capacity, so the availability of these resources is higher than on-demand. |
TPU v5e, Trillium (TPU v6e) [Zones TBD] | Billing: Hourly, based on actual usage |
ML users who want short-term capacity for jobs that take less than 7 days. More about DWS is described here. Preview starting March 2025 |
Reservation: 3-year |
You request TPU resources in advance for a specific amount of time. These resources are reserved for your exclusive use during that period of time. Reservations provide the highest level of assurance for capacity and are cost-effective, with a lower price than on-demand resources. You can only use a reservation for TPUs if you have a committed use discount (CUD). For more information, contact Google Cloud sales. |
All versions and zones | Billing: Monthly, based on reserved quota |
Reservations are ideal for long-running training jobs and inference workloads. These are as they include 3-year committed use discounts (CUDs) |
Reservation: 1-year |
You request TPU resources in advance for a specific amount of time. These resources are reserved for your exclusive use during that period of time. Reservations provide the highest level of assurance for capacity and are cost-effective, with a lower price than on-demand resources. You can only use a reservation for TPUs if you have a committed use discount (CUD). For more information, contact Google Cloud sales. |
All versions and zones | Billing: Monthly, based on reserved quota |
Reservations are ideal for long-running training jobs and inference workloads. These are priced lower than on-demand as they include 1-year committed use discounts (CUDs) |
Note
We recommend DWS Flex Start, DWS Calendar Mode (coming soon) or Reservations for Kithara.
4. Choose a type of capacity#
Once you have decided on the billing mode, there are three ways you can secure capacity to create VMs:
VM Type |
Supported Usage Modes |
Recommended For |
|---|---|---|
Queued Resource |
DWS, Spot, On demand |
Any non-GKE usage |
Google Kubernetes Engine |
DWS (Coming Soon), Spot, On demand, Reservations |
Any GKE Usage |
Compute Engine |
DWS, Spot, On demand, Reservations |
Customers with reservations |
Before you can create VMs, you must request quota. Read more in the next section.
5. Quota#
Once quota has been granted, you can create as many Dynamic Workload Scheduler (DWS), spot, on-demand, reservation VMs as the quota allows.
When working with Cloud TPUs, you’ll encounter quotas that govern your usage. These limits manage availability.
For example, you might have a quota on:
The number of TPUs you can create: This prevents over-provisioning and ensures resources are available for all users.
The type of TPUs you can access: Quotas are tied to a particular TPU type (e.g: v5e) and a particular VM type (spot or on-demand).
These quotas help ensure fair access, prevent abuse, and maintain the stability of the cloud platform. If your project requires more resources than your current quotas allow, you can typically request increases.
To use TPUs with GKE, a separate quota is required. GKE quota is allocated in terms of number of chips. Non-GKE quota is allocated in terms of number of cores.
Read more about quotas and how to request them here.
6. Provision Capacity#
Once you have determined the type of TPU, type of capacity and usage mode, you are ready to provision capacity.
Queued Resource → |
||||
GKE VM → |
N/A |
Spot (Add |
Reservation (Add |
|
Compute Engine VM → |
N/A |
Spot (Add |
Reservation (Add |
Create DWS (Flex Start) VMs [Coming soon by end of March 2025]#
Flex Start uses the TPU queued resources API to request TPU resources in a queued manner. When the requested resource becomes available, it’s assigned to your Google Cloud project for your immediate, exclusive use. After the requested run duration, the TPU VMs are deleted and the queued resource moves to the SUSPENDED state. For more information about queued resources, see Manage queued resources.
To request TPUs using Flex Start, use the gcloud alpha compute tpus queued-resources create command with the --provisioning-model flag set to FLEX-START and the --max-run-duration flag set to the duration you want your TPUs to run.
gcloud alpha compute tpus queued-resources create \
<your-queued-resource-id> \
--zone=<your-zone> \
--accelerator-type=<your-accelerator-type> \
--runtime-version=<your-runtime-version> \
--node-id=<your-node-id> \
--provisioning-model=FLEX-START \
--max-run-duration=<run-duration>
Replace the following placeholders:
<your-queued-resource-id>: A user-assigned ID for the queued resource request.<your-zone>: The zone in which to create the TPU VM.<your-accelerator-type>: Specifies the version and size of the Cloud TPU to create. For more information about supported accelerator types for each TPU version, see TPU versions.<your-runtime-version>: The Cloud TPU software version.<your-node-id>: A user-assigned ID for the TPU that is created when the queued resource request is allocated.<run-duration>: How long the TPUs should run. Format the duration as the number of days, hours, minutes, and seconds followed byd,h,m, ands, respectively. For example, specify72hfor a duration of 72 hours, or specify1d2h3m4sfor a duration of 1 day, 2 hours, 3 minutes, and 4 seconds. The maximum is 7 days.
You can further customize your queued resource request to run at specific times with additional flags:
--valid-after-duration: The duration before which the TPU must not be provisioned.--valid-after-time: The time before which the TPU must not be provisioned.--valid-until-duration: The duration for which the request is valid. If the request hasn’t been fulfilled by this duration, the request expires and moves to theFAILEDstate.--valid-until-time: The time for which the request is valid. If the request hasn’t been fulfilled by this time, the request expires and moves to theFAILEDstate.
For more information about optional flags, see the gcloud alpha compute tpus queued-resources create documentation.
Get the status of a Flex Start request#
To monitor the status of your Flex Start request, use the queued resources API to get the status of the queued resource request using the gcloud alpha compute tpus queued-resources describe command:
gcloud alpha compute tpus queued-resources describe <your-queued-resource-id> \
--zone <your-zone>
A queued resource can be in one of the following states:
WAITING_FOR_RESOURCES: The request has passed initial validation and has been added to the queue.
PROVISIONING: The request has been selected from the queue and its TPU VMs are being created.
ACTIVE: The request has been fulfilled, and the VMs are ready.
FAILED: The request could not be completed. Use the
describecommand for more details.SUSPENDING: The resources associated with the request are being deleted.
SUSPENDED: The resources specified in the request have been deleted.
For more information, see Retrieve state and diagnostic information about a queued resource request.
Monitor the run time of Flex Start TPUs#
You can monitor the run time of Flex Start TPUs by checking the TPU’s termination timestamp:
Get the details of your queued resource request using the steps in the previous section, Get the status of a Flex Start request.
If the queued resource is waiting for resources: In the output, see the
maxRunDurationfield. This field specifies how long the TPUs will run once they’re created. If the TPUs associated with the queued resource have been created: In the output, see theterminationTimestampfield listed for each node in the queued resource. This field specifies when the TPU will be terminated.
Delete a queued resource#
Important: Queued resources consume quota regardless of their state. Delete queued resources after use to avoid blocking future requests on quota limits.
You can delete a queued resource request and the TPUs associated with the request by deleting the queued resource request and passing the --force flag to the queued-resource delete command:
gcloud alpha compute tpus queued-resources delete <your-queued-resource-id> \
--zone <your-zone> \
--force
If you delete the TPU directly, you also need to delete the queued resource, as shown in the following example. When you delete the TPU, the queued resource request transitions to the SUSPENDED state, after which you can delete the queued resource request.
To delete a TPU, use the gcloud alpha compute tpus tpu-vm delete command:
gcloud compute tpus tpu-vm delete <your-node-id> \
--zone <your-zone>
Then, to delete the queued resource, use the gcloud alpha compute tpus queued-resources delete command:
gcloud compute tpus queued-resources delete <your-queued-resource-id> \
 --zone <your-zone>
For more information see Delete a queued resource request.